
I've been playing around with using the amateur radio capabilities of the International Space Station for about as long as I've held my ham radio license. The ISS is one of the easiest satellites to work and while I've had success with a simple antenna on my handheld radio, having a directional antenna makes the task much easier. In this article I'll show you how to make a lightweight, portable antenna that is well suited for working the ISS.
Shortly after obtaining my technician class license, I went out to see if I could hear any satellites. Using my humble Baofeng UV-5R, I waited for the next pass of the ISS. To my surprise I could actually hear it. At the time they had the digipeater function active, so really I just heard the squawk of APRS packets, but it was still exciting and got me motivated.
I didn't want to invest much money back then, so when I found KG0ZZ's $4 Satellite Antenna, I had to make one. The design used a plank of wood and wire clothes hangers for elements. It had four 2 meter elements and seven 70cm elements which were fed together like a fan dipole.
 |
| KG0ZZ's $4 Satellite Antenna |
The $4 dollar satellite antenna worked great. It was highly directional and I managed to not only make contacts through the ISS, but also PCSAT and SO-50. However, the antenna is a bit heavy and isn't very portable because the elements don't easily come off for storage.

Another popular antenna option for use with the ISS, is the Tape Measure Yagi. Just doing a quick web search will pull up many different version of it. I've also built one and they work really well. They're lightweight and the elements can fold up to make it a good portable option. I had access to a 3D printer when I built mine and followed the instructions by Becky Stern.
I used the tape measure design for quite a while. I even used it during public service events to get my signal into a distant net control station. But the downside of tape measure elements is they are very susceptible to wind and eventually one of the 3D printed element supports broke.
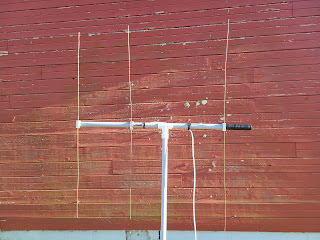
It got me thinking about designing my own. I used the measurements from the tape measure variant because it had a good SWR on both the ISS 2M and 70CM frequency used for their crossband repeater and I modified it to use the elements I had already cut as part of the $4 satellite antenna.
 |
| 3 Element Wire Yagi |
The 3D printed element holders I designed fit a bit loose on the 3/4" gray PVC boom, so I wound up putting a piece of electrical tape on the inside of each one to make it fit more firmly. (I may try to fix this in a future design.) I marked the element positions with a sharpie on the boom so they can be slid off and tied to the boom for storage or transport, then slid back on when needed.
 |
| Driven Element |
The driven element holder is designed for use with 4-40 bolts and screws. There is a notch on each element that will hold a bolt just forward of the wire so that the screw head and small washer will physically hold the coax connection to the wires.
 |
| Director/Reflector element with glue. |
While the fit of the wire inside each holder seems to fit firmly, I added a drop of super glue to the spots where the elements enter each plastic holder. Just making sure they wouldn't move around.
The SWR plot was very similar the the tape measure version. I wasn't sure what to expect since I was going from such wide elements to a narrow wire, but the SWR was good on the entire 2 meter band and was also a good match at the 70cm frequency used by the ISS. Initial testing demonstrates that performance is the same as the tape measure version also.
By no means is it necessary to use a high gain directional antenna for the ISS. You can usually work the digipeater with a hand held radio and rubber duck antenna on a good high pass. But if you are going to try and make a voice contact via the crossband repeat, I highly recommend building one of these antennas.
No comments:
Post a Comment